Local & Seasonal Cooking with Rita Calvert: Grilling 101 with recipe
Local & Seasonal Cooking
with Rita Calvert
from The Grassfed Gourmet Fires It Up!

We’re well into grilling season, so here is one of my favorite recipes from The Grassfed Gourmet Fires It Up!, which you can find at Annapolis Green on Maryland Avenue in Annapolis. First comes a Grilling 101 section, a primer actually, from the book and then a recipe where I made fun and efficient work of mouth-watering sliders for a crowd.
Grilling 101
I want to share this confession from a dear friend who loves farm-fresh food and vows to spend as much time outdoors as possible. “As much as I adore grilled food, I do not know how to do this myself. I don’t even know how to turn on the gas grill or build a charcoal barbecue fire.”
She’s game to try it now with the same easy tips I am sharing here with you. You can find more details in many other books and websites but this basic primer will get you started and reduce the stress of this oh-so-versatile cooking method that makes food so tasty. With this primer and the recipes you’ll find in The Grassfed Gourmet Fires It Up!, you will be barbecuing all summer (or year-round) like an old hand. Start by practicing on yourself or with a small group.
Plan ahead
You can cook just about anything on the grill. With just a little planning, you will have your indoor kitchen clutter-free and cleaned up, even before serving the meal, regardless of whether you’re cooking for yourself, your family, or a whole gang of friends. Best of all, you won’t be washing loads of pots and pans in the wee hours after a relaxed meal. If you plan side dishes that are safe to serve at room temperature, such as breads and simple vegetable and potato side dishes, you will have even more freedom to prepare ahead and then relax.
For a crowd, you can prepare side dishes ahead (or assign sides to your guests), present them on serving platters, then completely clean up your indoor kitchen before the meal.
If you’re cooking for a party, get the basics—such as the centerpiece, plates, flatware, serving pieces, and some condiments—on the table before guests arrive. This will save time later in the evening when your food is ready for serving.
Set the stage for grilling
Before you fire up the grill, be practical. Position your grill away from all shrubbery, overhangs, grass, or other flammable surfaces or materials. Don’t even think about a closed area like a garage. Your grill should be on a stable surface. Never use gasoline or kerosene to start your fire. And make sure the grill is clean and the vents are open and airy—they should not be clogged with old ashes.


Choose your grill
When it comes to quick and easy cooking, a gas grill is probably the most convenient way to go, but nothing beats the flavor of foods cooked over real wood or charcoal. Not to worry, though, because you can do both at once.
Add real wood flavor to your gas-grilled foods by placing small green or water-soaked wood chips on foil that has been punctured with a few holes to let air circulate. Start the grill and then place the package on a portion of the gas element and let it start to smoke. If you are using a charcoal grill, be aware of the time it takes to prepare the fire and heat the grill before you start cooking. This can vary depending on the type of wood or charcoal you use, so test different brands beforehand and stick with the one that works best with your grill.
Prepare your grill
Prepare the grill by rubbing clean grates with cooking oil using a paper towel. Food won’t stick and cleaning up is far less messy and stressful.
Always preheat your grill—with the lid closed—for the time recommended for the brand and style of your grill or to the suggested temperature in the recipe you’re following. Gas grills need to be turned on at least 10 minutes before cooking. If you use a charcoal grill, allow the coals to burn for at least 30 minutes or until the flames subside before cooking.
Note: Always keep the bottom tray and drip pan of your gas grill clean and free of debris. This not only prevents dangerous grease fires, but it also deters visits from unwanted critters. A sprinkle of red pepper in the pan is another safe way to discourage animals.
Light your Grill
For gas grilling: Read all grilling instructions that came with your grill first; every grill ignites differently. In general, however, you start by opening the grill lid, then opening the tank valve, then turning the front/first burner to high heat. Allow 2 to 3 seconds for the gas chamber to fill. Then push the igniter button firmly. The burner should light after only one or two pushes of the button. Once the first burner is lit, turn the middle/next burner to high heat and repeat with the other burners until all burners are lit. Close the lid. Allow the grill to preheat on high to 500° to 550°F. Place your food on the cooking rack and adjust burners to the temperatures and cooking method given in the recipe.
Consult your grill’s instructions about what to do if there are flare-ups. In my experience, when flare-up occurs, I turn all burners to the off position and then move the food to another area of the cooking grate. Then, I light the grill again. Never use water to extinguish flames on a gas grill.
For charcoal grilling: I have found the best method for firing up a charcoal grill is with a quick-start chimney. They usually sell for about $12-15 where grills are sold. Fill the bottom of the chimney with some crumbled newspaper, then place charcoal or briquettes on top of that, and ignite. In about 25 minutes, your coals should be ready. The charcoal will be lightly coated with ash. Carefully pour the heated charcoal out of the starter and into the grill. Arrange it evenly across the charcoal rack for the “direct method” of grilling or on either side of grate for the “indirect method” of grilling. New terms? See below.
Another option for starting your charcoal grill is to place crumpled newspaper or fuel cubes on the charcoal grate. Cover the paper with charcoal briquettes to form a pyramid (not too huge) and then light the charcoal. It should be ready in about 25 minutes when a light grey ash coats all of the briquettes. We recommend learning to do this without using lighter fluid to keep your grilling simple, clean, and safe.
Choose your grilling method
Before preparing your grill, decide if the food you are grilling requires “direct” or “indirect” heat. With a little practice, these two approaches to cooking will become second nature—and you will have mastered one of the most important grilling techniques. Remember, though, whether you are cooking with the direct method or indirect method, always grill with the lid on.
Grilling with direct heat is similar to broiling except that the heat source is below the food; in other words, the food is cooked directly over the heat source (thus “direct” heat cooking). Use the direct method for foods that take less than 25 minutes to cook, such as steaks, chops, kebabs, sausages, and vegetables. Direct cooking is also necessary in order to sear meats.
The indirect method is similar to roasting but with the added benefit of grilled texture, flavor, and appearance, which you can’t get from an oven. This is best for foods that require 25 minutes or more of grilling time or foods that are so delicate that direct exposure to the heat source would dry them out or scorch them. Use the indirect method for roasts, ribs, whole chickens, turkeys, and other large cuts of meat as well as for delicate fish fillets.
Direct-heat cooking: how-to
To grill on a charcoal grill using a direct-heat method, spread prepared coals evenly across the charcoal grate. Set the cooking grate over the coals and light the coals. Once the coals are ready, place the food on the cooking grate. Close the lid, lifting it only to turn food or to test for doneness at the end of the recommended cooking time.
To grill on a gas grill using a direct-heat method, preheat the grill with all burners on high. Place the food on the cooking grate and then adjust all burners to the temperature noted in the recipe. Close the lid of the grill and lift only to turn food or to test for doneness toward the end of the recommended cooking time.
For even cooking, food should be turned once halfway through the grilling time. Searing creates that crisp, caramelized texture where the food hits the grate. Those nice grill marks add more than visual appeal, they flavor the entire food surface. Steaks, chops, chicken pieces, and larger cuts of meat all benefit from searing.
Indirect-heat method: how-to
To grill on a charcoal grill using the indirect-heat method, arrange hot coals evenly on either side (or around the perimeter) of the charcoal grate. A drip pan placed in the center of the charcoal grate between the coals is useful to collect drippings that can be used for gravies and sauces. It also helps prevent flare-ups when cooking fattier foods, such as chicken or turkey with the skin on, goose, duck, or certain roasts. For longer cooking times, add water to the drip pan to keep drippings from burning. Place the cooking grate over the coals, light the charcoal, and once the grill is heated, place the food on the cooking grate, centered over the drip pan or charcoal grate. Close the lid and lift only to baste or check for doneness at the end of the suggested cooking time.
If you are using a gas grill, preheat the grill with all burners on high. Then adjust the burners on the sides to the temperature noted in the recipe. Turn off the burner(s) directly below the food. For best results, place roasts, poultry, or large cuts of meat on a roasting rack set inside a disposable heavy foil pan. For longer cooking times, add water to the foil pan to keep drippings from burning.
In some cases, it is best to sear the food first to obtain grill marks and then place the food in a cast iron or an aluminum pan to catch the juices for the rest of the cooking time. Heat rises, reflects off the lid and inside surfaces of the grill, and slowly cooks the food evenly on all sides. The circulating heat works much like a convection oven so there’s no need to turn the food.
Prepare meat, poultry or seafood for grilling
For steaks and chops, trim excess fat, leaving only a scant 1/4-inch of fat, which is sufficient to flavor the meat. For poultry, note that the skin has enough fat to feed the flame, potentially leading to flare ups. Less fat is a virtual guarantee against flare-ups and it makes cleanup easier.
After trimming the meat, marinate according to the recipe or rewrap and chill. About an hour before grilling (but for food safety, no earlier), allow meat to come to room temperature.
Cooking tips
Create two temperature zones in your grill: one warm and one hot. If you use a gas grill, turn one side to high heat and keep the other on low. If you use a wood/charcoal grill, the trick is to push most of the embers toward one side. This will help cook pieces of food more evenly by allowing you to periodically move them from low heat to high.
Hold the sauce. If you’re using barbecue sauce or any sauce that contains sugar or fat, wait until about the last 15 minutes before slathering it on (if you’ve marinated your meat in advance, just blot it with a paper towel before placing it on the grill). Since sugar and oil will cause lots of flames and char the food, plan to reduce the heat a bit after you add the sauce.
Allow more cooking time on cold or windy days or at higher altitudes, and less time in extremely hot weather.
Once you put the food on the grate, allow it to cook a bit before any turning. Your food needs about 10 minutes of cooking time for its surface to cook enough to release from the grill easily without sticking and tearing.
Always use a spatula or tongs when you handle the meat on the grill. Using a fork to pierce meat while it is cooking will cause all the yummy juices to escape, thereby drying out your meat.
Use a meat thermometer and a timer so you know when it’s time to take food off the grill. Checking meats for internal temperatures is the best way to determine when food is properly cooked or when done is about to become overdone.
Soon after you finish cooking, use a wire brush to scrape and clean the grates—it’s so much easier to clean it up when it is still warm.
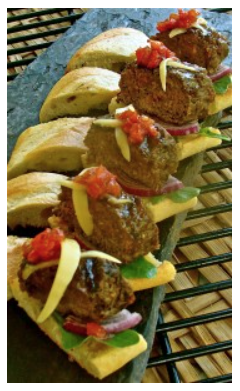
Spicy Ground beef or Bison Sliders
with Talbot Reserve Cheese and Curry Ketchup
Serves 8
 Each of these sliders weighs about 1 ounce so the ground beef or bison goes a long and tasty way as small bites or hors d’oeuvres. I have served these at my River Dinners and at a local cooking class because everyone loves a great burger. I topped each slider with a rich, cave-aged cheddar from Chapel Country Creamery in Easton, Maryland. You can garnish and build these sliders as you wish… adding to the bread or letting your guests add their own toppings, such as sliced onions, pickles, and lettuce or arugula. It’s a good idea to make the curry ketchup in advance and keep it refrigerated.
For the sliders:
• 12 ounces ground beef or bison
• Kosher salt and freshly ground pepper to taste
• 1 ciabatta loaf of bread, sliced horizontally, but not through, to open like a book
• Freshly grated Talbot Reserve or other full-flavor aged cheddar cheese, room temperature
Heat the grill to medium-high.
Place the beef or bison in a bowl and add salt and pepper, stirring briefly with a fork. Form the meat into 2 rectangular burgers, ¾-inch thick, so they fit neatly onto the bread.
Grease the grill rack and add the burgers without crowding. Grill on one side until nicely browned, then turn and brown the other side, making sure that the burgers remain rare and juicy. While the second side browns, top the burgers with the cheese to allow it to melt. Place the opened ciabatta bread on the grill until just golden and warm. Then, while still warm, spread one side liberally with curry ketchup.
Remove the burgers to a cutting board and let rest for a moment. Lay the open ciabatta on the cutting board. Place each burger on the bottom half of the bread. Close the bread firmly and cut crosswise into 2-inch thick slices. A toothpick in each slice holds it all together and makes it easy to pick up.
For the curry ketchup:
• 1 12-ounce bottle chile sauce
• 1/3 cup sweet onion, finely chopped
• 1 teaspoon curry powder
• 1 teaspoon balsamic vinegar
Combine all.
With over three decades in the food, media production, marketing & public relations fields, Rita Calvert has created myriad programs, events, cooking sessions on national television, the stage & The Annapolis School of Cooking. She has partnered in writing cookbooks and product lines to showcase the inspiration & nourishment of food. In her cookbook with Michael Heller, The Grassfed Gourmet Fires It Up, Rita supports the effort for Regenerative Agriculture.